Foot Care
November 13th, 2015
Blisters will — eventually — render you ineffective.
Blisters are caused by burns, allergies, skin conditions or bites. The most common cause is friction. Cell damage occurs when there is enough friction in a focused spot. The fluid inside a blister protects and heals the damaged tissue.
Several things that make blisters more likely to occur:
- Pressure: Tight spot in your boot or a wrinkle in your sock could create friction pressure points.
- Direct friction: Locations where a shearing force grabs the skin and slides can cause a blister. This could happen inside your boot heel. Eventually the upper skin layer separates and fluid enters the space, causing a blister.
- Moisture: Moist and sweaty skin is softer skin. Soft skin is susceptible to damage when friction occurs.
To prevent blisters:
- Toughen your feet. Your body will adapt to stressors; use this to your advantage.
- Wear proper equipment. Wear fitted and well broken-in boots, and proper socks.
- Address your feet. Carry a Foot Care kit to resolve hotspots or address blisters.
1. Toughen your Feet
Barbell your feet
Your body is antifragile. The more stress your feet receive, the stronger they will become — to a point. The tougher your feet are, the less they will get hurt. It takes time and effort to toughen feet. Start walking with a not-too-heavy load. Walking without a load eliminates optionality for using a load — particularly heavy loads — in future hikes.
Start light when beginning to hike while bearing load. Wear thin socks. Go far enough until you begin to feel your first hotspots. If you get hotspots early or too often, you may have not broken in your footwear equipment. Gradually increase distance, load, and elevation.
When not bearing load, walk everywhere with minimalist shoes. Wear minimalist shoes at work, the gym, shopping, or walking around the neighborhood. Walk barefoot when you do not need shoes; watch your step to avoid injury.
Exercise using load-bearing exercises like deadlifts, front squats, back squats, cleans, and push jerks. Incorporate jumping rope — particularly doubleunders — and burpees to strengthen arches, and adopt plyometrics like box jumps to strengthen achilles tendon.
Train with the same equipment you use when getting after it.
Rest your feet
Your body also needs to recover in order to adapt to stress. Feet require care. Rest is essential but not always an option. You want the option to not rest and still be effective; therefore, you must toughen your feet. If you have the option for rest, take it.
Get rid of calluses. Friction damage can occur below layers of toughened skin. This can result in more pain than non-toughened skin. Use a pumice stone or other methods to file down calluses on all parts of your feet.
Moisturize feet. Use for recovery after long hikes. Lotion will keep your feet hydrated and will aid in recovery. Epsom salts can work well, too.
Cut your nails. Trim your toenails regularly. Use a file on rough surfaces. This will prevent the nail from snagging the sock and creating a bur that leads to friction.
2. Wear Proper Equipment
Find the right gear. Put time into tinkering with different boot, sock, lace, and liner combinations. The equipment you adopt must be decisive. Spend enough time with the equipment that it becomes one with you, as if it does not exist alone outside of you.
Boots, boots, boots
The boots you choose are just as important as toughening your feet.
If you have the choice of boot, good for you. If you do not have the choice of boot, then find a boot size where your heel sits tightly to the rear of your foot. If your foot slides, you’ll have friction. If your boots are too tight, you’ll have friction. Some fellows advice others to use a half-size larger for when your feet swell on long hikes. You do you. I do not size up.
Use boots with ventilation and water drainage. Proper boots allow your feet to breathe and dry out when wet. Do not use water-proof boots.
Two is one, and one is none. And if your primary boots are rendered inoperable you want the option to use a well-broken-in backup pair. Two pairs of broken-in boots are essential.
Socks, socks, socks
The socks you choose are just as important as toughening your feet.
Avoid cotton; cotton socks retain moisture while synthetic and wool socks do not retain as much moisture. Avoid large socks. After you toughened your feet, implement increasingly thinner socks. Thin socks cause less sweat. Less sweat means less moisture. Less moisture means less hot posts. Less hotspots means less blisters.
Wear proper fitted socks. Too big and you will have wrinkles. Too small and you will create pressure points which could result in friction. Change socks often. Fresh socks return your feet to a low moisture level. Always carry a few pair of fresh socks on your person.
Get to the point where you can avoid double bagging your feet with multiple layers of socks. More than one layer of socks will create additional friction; however, there is something to be said that multiple layers will create friction between socks rather than between the sock and your boot. Tinker with the following: Synthetic thin base layer underneath wool. The second layer reduces friction and will absorb the moisture wicked away from the base layer sock while offering extra cushion.
3. Address Your Feet
Preparation
Prepare a Foot Care Kit in a water-proof bag
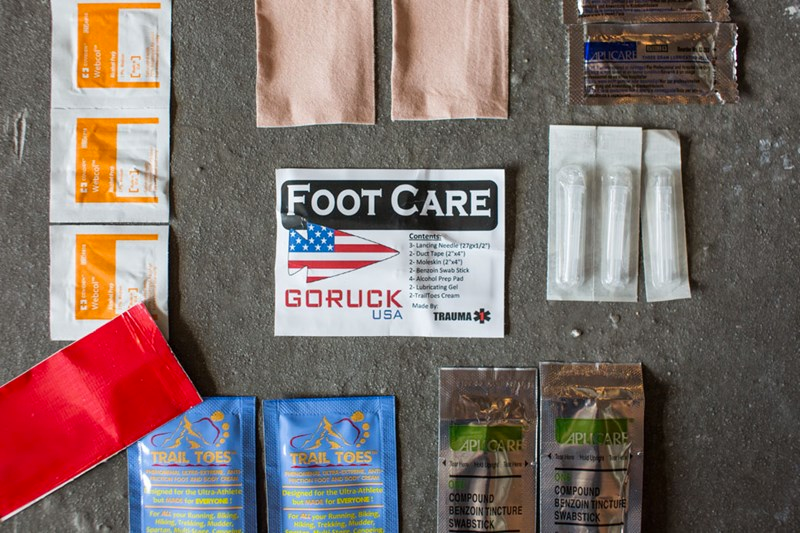
Foot Care Kit
3 - Lancing Needles
2 - Duct Tape (2x4)
2 - Moleskin (2x4)
2 - Benzoin Swab Stick
4 - Alcohol Prep Pad
2 - Lubricating Gel
2 - Trail Toes Cream
1 - Nail Clipper
Consider applying skin lubricant. We use skin lubricant for thighs, groin, underarms, and nipples to protect against friction. Consider applying Body Glide directly to your feet.
If you must use socks you haven’t used during training, prepare for blisters due to sock stitching. Stitching causes hot spots. To address stitching, rub your feet down with a very light coat of powder, put socks on your feet, take socks off, and turn socks inside out. Wipe your feet down so there’s no residue from the light coat of powder — which can cause friction.
Take preventative action
When you sense an uncomfortable spot, stop, fill up with water, and then take your boots and socks off. If the area is even mildly red, dry the area and apply Moleskin.
Cut a piece of Moleskin so it fits over the affected area and make a hole in the Moleskin so that it doesn’t rub the damaged skin area. Put on a dry pair of socks when finished treating the blister. If you don’t have a dry pair, wring out the pair you have as much as possible and clear out any debris before putting them back on. If your blister is a blood blister, treat it the same as any other blister.
If you find a blister, consider lancing it.
Addressing a blister
In general, refrain from opening a blister to release the fluid due to risk of infection and a longer recovery period. If necessary, drain the blister when it is too painful to leave undrained. To drain a blister, follow the steps below. If the blister pops on its own, then follow steps 4 and 5:
- Wash the blister and surrounding area with alcohol pad or antibiotic soap.
- Sterilize a needle with alcohol pad or heat.
- Insert the needle near the base of the blister.
- Dress the blister like you would a wound, using antibiotic ointment and gauze or a Band-Aid.
- Cut and place Moleskin with a doughnut hole around the area to prevent further irritation; for added protection, fill the hole with antibiotic ointment or a blister pad, then add a layer of tape over the top.
- Watch for infection. Keep a close eye on it. Evacuate to get medical care if you develop redness, pain, pus or red streaks traveling toward the nearest lymph node.
Bottom line
If you do not take care of hotspots and blisters, you will walk differently to compensate for discomfort. If you change the way you walk, this can cause injury. These injuries include stress fractures, breaks, tendonitis, plantar fasciitis, sprained or broken ankles, and pain or problems in your knees, hips, and back. Listen to your feet. Learn from your feet. Become one with your feet.
Keep in touch!